Monday, October 30, 2023

Life Without Internet, AGAIN!

Yep! Early Thursday the internet went out yet again, and didn't returned until Monday the 30th. In that time I started playing Dragon Quest 3, which has been fun. For years I've had the Game Boy Color version of Dragon Warrior 3, but I didn't want to stare at a tiny screen for hours on end. When I found a translation for the Dragon Quest 3 remake for the Super Famicom I decided that would be the route I took. I really missed getting stuck into a classic RPG when the daylight rests early and the Sun's heat wanes. My ultimate goal is to get back to DQ8, because I bought a copy in about 2010 and played quite a bit of it, but it felt weird not having played the first game. I quit playing eight and took on the first one, in all its antiquated glory. I really did enjoy it. I also enjoyed the second one, so the next logical step was three, but it took years for me to get around to it. Now that I'm playing it, I wish I had done it years ago. There are a ton of things in my life I wish I had done years before I actually did. Life lesson, kids!

Another thing I wish I had done years before I actually did was building guitar pedal circuits. I've said it before, but this desire started long before I ever soldered anything. I ran across BYOC's website and wanted a kit, but never bought one. After the messy end to 2019 I decided 2020 was going to be my year, and it was, at least in terms of starting pedal clone builds. On October 26th I built the 40th clone circuit of the year, The Dane, which I'm finding to be just another overdrive. Now, I opted out of adding the boost and lows control, so I might be missing out on a whole set of dynamics. It's not a bad overdrive, it's just simply an overdrive. On the plus side, should I decide I need the boost later, tagboard effect's layout included a separate layout for that as well, so it's always an option.

Time without the internet has also given me a bit of perspective, which I'm starting to believe is a bad thing. Back in September I built a slightly modded CMAT Mods Butah clone, which I've dubbed the Blues Master MKIII, and while I like it, I wasn't sure what exactly I was going to do with it. That is until my brain had too much time to think, instead of being clogged by the internet, and I've decided to make it the blue channel on my own Browne Amps Protein style clone. I'm super excited to get the green channel built because I've always wanted a Nobel's clone. I've decided that must be why I built the Butah clone; to become the blue channel to the Green channel I didn't even know existed until after I had already built the Butah clone. Funny how things work out.

The tiny little builds are still set up for November and December, as the first of November fast approaches. I believe I already see a date for the November build, this weekend as a matter of fact, so I'm hoping the weather and internet hold out so that I can get the first one done and report back. Sadly the December build it going to be quite a bit more difficult as I want to build it on a specific date. This year wasn't just about mass building, it was also about building on dates that mean something to me. I have accomplished a few of those, but December 14th or 23rd seem like they're going to be just too cold. However, that's why I'm saving the smallest build for December. Even if I need to do it indoors, it's a simple enough circuit I could throw it together quickly. We'll just have to wait and see.

Wednesday, October 25, 2023

Ok, So I Fibbed

Over the past three weeks the internet has been sporadically up for a total of seven of those days, and it's been sketchy at best. Between the internet taking a big old dump on itself, thanks Bright Speed, I downloaded some layouts that I had planned to build in 2024. To while away the hours without internet I decided to actually start putting those kits together, instead of waiting for the winter months. Well, that turned into having a total of five more kits ready to be built. Whoops!

Now not only do I have small builds to sneak into the months of November and December, I have one final build for the 2023 season. That will be a clone of The Dane's overdrive section. I know, I know, I have too many overdrives as it is, but a wise man once said "You can never have too many overdrives, unless they're all connected together and all of them are dimed." Actually, that's not a real quote, but maybe someone has said that in the history of the world, I don't know.

I still need to put together the secret project, but I'm putting that off for the newest build, and I have to find a day within the end months of this year and get the tiny little builds done. Apart from that I have a Boss SP-1 clone kit ready to go, a Cornish SS-2 and CC-1 clone kit ready to go and a Browne Amps' Protein Green Channel clone kit ready to go. The last of which is supposedly based on the Nobel's ODR-1, which I've been really looking forward to eventually building a clone of. I'm debating pairing it up with the newest Bluesbreaker clone I built not that long ago. They might compliment each other in a really nice way. Kind of my own clone of a Browne Amps' Protein.

The moral of the story is never say it's over before it's actually over, because you never know what will draw or push you back to where you never thought you would be again. I thought the build season was wrapped up and I was just waiting for nice days in November and December, now I'm waiting to see what tomorrow's weather will be like to do this new overdrive clone build. Pending Bright Speed doesn't shit itself again, I'll report back. Trust me!

Wednesday, October 18, 2023

2023 Pedal Build Wind Down

As 2023 winds to a close I can officially say there are only two planned builds left. I still need to put together the super secret project, but as far as from scratch builds only two remain. The two left are planned just to have tiny little builds for November and December. When I say tiny, I really do mean they're tiny little builds. One is 6x6 and the other is 7x7 sized stripboard with less than ten components all in, so we'll see how those work out. In total I've done thirty-nine builds this year alone, and with two more that means I will have built over forty circuits in one year. Looking back I see where there has been lag time between builds and I know that if I were to put in more effect I could easily build fifty in a year, but for 2024 I do plan to focus more on housing the circuits I've built this year, rather than building in mass again.

The reality being I don't really need many more pedals. I already have delays, reverbs, tremolos and a ton of overdrives and distortions. What else do I need? I am thinking of building a looper so I can build a new pedalboard. Apart from that I might just build a few easy circuits to see how I can modify them or use different component values like I did with experiment #64. For 2024 I do have a few ideas that are almost locked in as builds though, such as a Boss Spectrum clone, a Bearhug compressor with a few modifications, and a couple Cornish clones to use up my single op-amp stock. I'm still debating building a Deep Blue Delay clone, and maybe, just maybe I'll try my (left) hand at another HM-2 clone. Firstly I will do some more testing with the HM-2 clone I built before I dedicate more materials to another one. I actually think I might know what I did wrong with that build, and if I'm right that I was wrong it may sound better once I get it dialed in.

In 2024 I really do need to use up my LM741 and TL071 stock, as the large majority of the circuits I've built use dual op-amps. Speaking of, I also need to use up my fake TL072 stock, which I've learned work well with very little to no gain pedal circuits. I also have a few TL074s and a single LM324 which probably could use good homes. I think you get the idea of how this works. I have parts, parts need homes, search for homes, find many circuits to build, oops I need more (x value) resistor/capacitor, etc. and the cycle just keeps repeating itself. It's not that pedal circuits are the only reason to have the components around, but it is currently the most fun and easiest reason.

Monday, October 16, 2023

Masters of Distortion

In a previous entry I questioned whether or not my Maxon DS-830 Distortion Master clone was truly a master of distortion. I can definitively say it is, but after some testing I've come to find that things aren't exactly perfect with my build. When I tested the circuit through my Noisy Cricket it sounded ok, but I was merely looking to see whether or not the circuit and controls worked. When I tested the circuit through Kali there was an odd sag that seemed to oscillate. I would hit a chord and the distortion would slowly swell in and out. I started troubleshooting the build by first checking the input JFET. The circuit requires a 2SK246Y, but I don't have any clue where to get one of those. Instead I went with a JFET from the same parts board I sourced the SC1815 transistors this build also requires and used a K223. 

Since I had the foresight to socket the JFET I started testing others that I had. I tried my J112, J113, another K223 and even a 2N5457, but the K223s were the only ones that worked. For completeness sake I turned the K223 around and it works either way. *Shrug* While I was swapping the K223's direction I had forgotten to unplug the power, which I usually do as a precaution, and the sag wasn't there. This told me that it probably wasn't the JFET at all, so it's probably a crappy electrolytic capacitor. When the circuit is powered off and back on the oscillating sag returns, but if the circuit is left powered up for a while it comes to life and works just fine. I'll need to test some of the capacitors and see which one might be causing the issue, or what else it may be. Aside from that I'm happy with how good this circuit sounds when it's firing on all cylinders.

Next up we have the super secret project I've been working on, which requires a screamer type circuit as the heart of the overall build. Since I built my Screaming Pumpkin I've found I'm not a fan of the clean bleed, or whatever you call it, that is common with 808 style circuits. Don't get me wrong, I love my Screaming Pumpkin, and TS808 circuits can sound great in the right circumstance, but this project is most certainly not that circumstance. I listened to demos of TS9, TS10, TS7, TS5 and even other kinds of TS circuits. I finally settled on the TS9 as my circuit of choice. As TS circuits go it didn't take long to put together and once I was done I went through my normal pre-test jitters. I'm anxious whether the circuit will work, and if it doesn't what will I need to troubleshoot/fix. Luckily for me everything went off without a hitch.

This circuit sounds really good, but as always I'm not sure it sounds as close as I wanted to the project circuit I'm going to end up building. Regardless, it is what it is and I will be moving ahead with it anyway. This project also requires a boost, which I just so happens to have a LPB-1 circuit laying around. I will also need to work on adding a blend circuit, which is something I got into earlier this year and built a few. Finally I need to work on some sort of bass boost switch to go along with it. So the project is a TS style overdrive, with a clean blend, a boost and a bass switch. Does that sound familiar?

Monday, October 9, 2023

Nostalgia Is a Hell of a Drug Part 3: The Lowrider Kid!

As a kid I had a small collection of 1:18 scale diecast model cars and a rather large collection of 1:24/1:25 scale model kits. Though they were all different kinds of cars they all fell victim to the fact that I was really into Lowriders. Even before AMT and Revell started making lowriders kits I was going to websites like Pegasus and Hoppin Hydros to get wheels and accessories to build my own lowriders. Now, let it be known I was great at painting the interior, engines, and setting up a stanced lowrider chassis, but I couldn't paint the body for shit. That's one skill I just could not master. I'm sorely disappointed to this day, as I really need to learn to spray paint for my guitar pedal building hobby. It's been years since I've tried, so I might be better at it these days, as I've learned how to be more patient.

The first official lowrider kit I can remember was AMT's 1970 Chevy Monte Carlo, which came with various hydraulic cylinders so you could stance it almost anyway you wanted. Model kits including extra parts to allow you to customize how you built the car wasn't new, but this blew my tiny little mind back then. The car was green on the box, but moulded in an off white/ grey color, so I knew mine was never going to look great. Even so, I built what I could, stanced it how I wanted and still enjoyed what I had created. I also had quite a few 63 and 64 Impala kits. I did paint one of the 64 kits blue, but the paint started to run on the rear quarter panel. I didn't care, it was the best I could do, so I lived with it.

Then came Lindberg, hitting heavy with their kits that included hydraulics. These were already moulded in nice colors, all I had to do was put them together. I had EVERY one of them, although I never got into their Pocket Hoppers line. My favorite by far was the S10. I actually still have one of the 63 Impala Red's Hydraulics Jokers that still works, kind of. I also bought the Hoppin Hydros Linberg D's, which were an upgraded lowrider wheel and white walled tire set for each and every one of them. It becomes apparent that I, at that age, had no clue what money meant.

Years later I bought a pre-built 1966 Bonneville kit off ebay thinking I could fix it. The previous owner had already setup the hydraulics, but the wiring was a rats nest. I tried to fix it, but all I really did was take it apart and forget how it went back together. I also tried to mate a Dodge Caravan kit with a Lindberg hydraulic chassis, which was going great, until I could never get the body to sit straight on the chassis. I also bought a metallic hunter green Chevy dually that I lowered and added wire wheels to. Soon after some company started producing a line of diecast bodied ones that looked a lot like mine. I have my suspicions they might have used mine as inspiration, I'll explain more at the end.

Something I only saw for a short period of time in the early 2000s and never seen since was a huge radio controlled lowrider with hydraulics and everything. It wasn't the Radio Shack Lowrider, but whatever it was never really lived up to the hype the ebay listing had promised. I used it the day I got it and put it back in the box for display, and as with almost all of my other model cars it was eventually sold. I even made my own lowrider from a super cheap remote controlled car I bought at a dollar store. There is also some other cheap lowrider car that came with a key fob that I have somewhere. I'll try to find those and add pictures below.

As a part of this hobby I also still have a small collection of Lowrider and Lowrider Bicycle magazines packed away. In the back of Lowrider Bicycle, if you flipped the magazine over, you had a whole half that was dedicated to lowrider scale model cars. I used to look at those cars and wish I could do stuff like that. It wasn't until model car companies started painting the bodies that I ever actually felt I was anywhere near that level, of course I still wasn't, but I felt as if I was.

Now way, way back in the old days of 2002 I started a website that, looking back, was poorly named. Low Ridez N 1:24. Yep, the early 2000s were a veritable wild west of misspelling to come up with something catchy. I wanted to be a one stop shop for all small scale lowrider information, and I really thought I was. I added anything and everything that came across my path that had to do with lowrider model cars, as well as photos of my own builds. Now all that's left is the web archive, but when they crawled the site they never archived the photos, which were literally kilobytes in size but whatever. So having my builds posted wasn't a concern, until I saw the diecast lowrider duallys that looked like mine. Maybe they did, maybe they didn't, it doesn't matter twenty years later, but to me it just seemed odd.

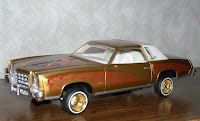
Prepainted 1977 Monte Carlo Snaptite
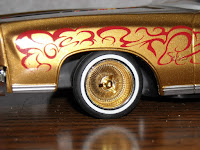
Upgraded wheels for the 77 Monte Carlo Kit
Dollar Store Blazer with real Hoppin Hydros wheels.
Oddball remote lowrider toy.

Saturday, October 7, 2023

Autumn is Here!

Ah, Autumn. What can you say about Autumn that hasn't already been said? *shrug* I guess you can say whatever you want about Autumn, I'm not your Dad. As for myself, as the darkness comes rolling in earlier and earlier, the temperatures start to drop off, just like leaves from the trees, I like to get stuck into an RPG. It's been a while since I have, but I like to give myself an RPG to get stuck into that takes up multiple days, if not months of my time to simply while away the cold months. Back in 2011 I finally sat down and played through Dragon Warrior (Quest) 1, a few years ago I played through Dragon Quest 2 and I set up Dragon Quest 3, fully intending to play it immediately, but guess what? Yep, I forgot.

Since I've been going through and beating NES games lately the urge for my Autumnal RPG playthrough has been super strong. So this year I'm thinking I'll surely play through Dragon Quest 3. Another reason is because I really, REALLY want to get back into Dragon Quest 8. Yeah, that's a hell of a leap isn't it? Well, I'm just going to have to work my way all the way back up to DQ8. It's the only way! The problem with Dragon Quest 3 is which version do I play? The original NES version? A translated Enchanced Super Famicom version? The Game Boy Color version? And I'm even reading there was a Super Enhanced Wii version? So many choices, so little time to decide.

As for pedal circuit builds I built the Distortion Master clone and it turned out - well, it turned out. It's distortion, I don't know if it's the master of distortion, but it sure is distortion. If you read my last entry you might recall (go back and read the final paragraph, go on. Go on! I'm giving you time. GO!) that I said I wanted to find projects to build in November and December just to say I've built pedal circuits in those months. Well, I found them. Super simple circuits that are less than half a dozen parts on a 6x6 piece of stripboard. Ten minutes each and I'll have myself a new pedal circuit. One build is planned for each month. I'm also still working on the mystery project, but it's going to take a bit of mental gymnastics to figure out how it goes together. Again, I'll show you when it's finished. By finished I mean complete and working, or I've set the fucker on fire so it can never hurt me again.

Wednesday, October 4, 2023

Shot for the Moon, Landed on Mars

One of my first circuit builds this year was a Kay T1 tremolo clone. To say it went poorly would be an understatement. The first problem was the layout has an error in it, which the author still has not fixed. Only after asking on the DIYPedals subreddit was the error in the layout brought to my attention, as well as how to fix it. Once it was fixed I was getting much better results, but it still ended up just being a warbly overdrive. Building a tremolo was really just an exercise in seeing if I could do it, and with such lackluster results I wasn't ready to try it again. However, I actually was, because I'm an idiot sometimes!

The Vico Vibe really got into my head and I wanted to build one so bad, but I just could not do another transistor-based tremolo and have it fail like the Kay T1 clone. While searching for help with the Kay T1 clone a nice young chap by the name of Ian kept telling me to shoot the moon, by which he meant build a Shoot the Moon tremolo. This one uses two op-amps and has four controls, so again I wasn't really willing to use all those parts just to face another failure. But, sometimes we just need to push through the fear of failure and do what needs to be done, so I did. I built the chopped down version of the circuit that boils it down to two controls, a shape switch and an internal trim pot.

The simplified Shoot the Moon tremolo is such an easy circuit to build, but even so I had my pre-test jitters thinking there surely had to be something I messed up on. The final step of any build is to put the op-amp(s) into the socket(s) and plug the power into the pedal to see what happens. I have a large stock of janky op-amps that can't take too much gain before they get fizzy. They were sold to me, and marked as TL072s, but in any high gain overdrive/distortion these things fizz more than Mentos in Diet Cola. I have learned that for low/no gain applications these things work amazingly. I don't know what they actually are, but so far they're sound absolutely amazing in this tremolo circuit. Which also means this tremolo circuit sounds amazing.


I was elated! Finally, a tremolo circuit that works and sounds awesome. I will say I haven't ran humbuckers through it, nor have I given it the Kali test to make sure it sounds good through my tube amp, but so far I am very happy with the results. I didn't heat shrink the LDR and LED yet, and I may not as they seem to work really well just the way they are. I did test it in a dark room, so I'm guessing an enclosure might be good enough, but I might heat shrink them in the future. The adjustable gain is a nice addition, and since I will most likely set it slightly above unity and forget it, I'm glad it's an internal trim pot.

Well, all I really have left to say is Thanks Ian! This tremolo circuit works, it works great and sounds great! Had he not suggested it, I may not have ever given it a try. So what we've learned here is from failure (the Kay T1 clone) we've been set on the path of something greater. Fear of additional failure kept me from testing that path, but eventually I decided to overcome that fear, and I'm glad I did. It's almost as if guitar pedal circuit building is teaching us life lessons. Funny isn't it? I still have a few builds left in the year and I've decided to plan small builds for November and December, just so I can officially say I've built during those months. Remember, I solder outside so my builds are very weather dependent. Should I get good weather for a singular November and December build the only month I've not built in would be February. We might just have to rectify that in 2024!

Monday, October 2, 2023

De-Repurpose

About ten years ago I picked up a Johnson Amplification J3 footswitch from a thrift store for about $2. Even though it looked like it had done a world tour, or two, I knew a few bucks would be a solid investment. Since I've never owned a Johnson amp, or their little modeler, I've never known if this thing worked or not. For years it sat in my closet without any purpose, until I started wanting to build a DIY A/B/Y box. It seemed to fit those needs well, in fact too well, but my A/B/Y didn't need three switches, so I had to sort out a way to plug the middle hole on the top. I would also need to drill additional holes for LEDs and the additional outputs.

Eventually I got around to drilling the holes and putting everything into place, but I never bothered soldering it together because I was really put off by the middle hole. Hindsight being more than just looking at big, round booties, I should have thought it through before drilling the additional holes and just left it alone. In the end I used a small 1590A enclosure and made a very simple A/B switcher and at that point the A/B/Y project was completely dead. Now I just had a J3 footswitch with extra holes and no wiring. So what do I do with it now? I rectify my stupid mistakes and fix it up, duh!

Lucky for me I had enough foresight, which has no questionable quip, and took photos of the insides so I could replace them, should I ever decide to do so. Which I have, obviously, that's why you're reading this right now. I'm sorry. I got everything set up and removed the excess outputs and LEDs, then I soldered back the coupled pair of 1N4148s which I always left alone, even when I needed them for pedal builds, and used the images I took all those years ago to rewire it back up. If you'll refer to the opening paragraph of this blog entry you'll remember I've never owned anything this footswitch will work with, so I still can't tell you whether it works or not. I can tell you that aside from some extra holes, which are now bugging me more so than just the middle hole when I wanted it to be an A/B/Y box, it's back together to the best of my ability.

Below I've provided the images I took before tearing the footswitch apart. These may help someone rewire theirs, or you can tell me that mine isn't wired correctly. The previous owner may have rewired it to work with something else, I'm not sure. That's the problem with having nothing to test this thing with. Again, it's wired to the best of my ability and that's what matters right now.