Saturday, November 5, 2022

Guitar Pedal Building: Learning as We Go.

Three years into pedal building and I'm still learning the basics of assembly, modifying and troubleshooting. After each build I go through a process of comparing my build with the genuine version from as many possible sound examples as I can find online. Sometimes I'm fairly close, sometimes I'm really close, and other times I need to tear the whole thing down and rebuild it from the start. The other alternative is to accept the results, but make notes in my paperwork to fix it later.

The problems all started with a few pedals I've built using LM741 op amps that I bought from Amazon, whose notes say *checks paperwork* weak op amp, question mark. I've bought a lot of op amps from Amazon and initially it seemed to be good value for money. Sadly, heaps of op amps started to come in weak, fizzy and in the case of a pack of TL071s I bought a month ago, not working at all. This has taught me which sellers to purchase from and why you spend a little more on a trusted seller, rather than save with a questionable seller.

The main example is my Rata Blanca pedal; for those who do not speak Spanish it's a Rat clone. I know some people demand any Rat circuit to have a 308, some will even accept an OP07, but I was going super cheap and wanted to use the 741 stock that I had. Not yet knowing the ones I hadn't used yet were all poor quality, I was in for a very bad time. Initial testing was extremely frustrating as the pedal would squeal at any gain above 30% with a very faint hint of a hissy effect underneath. I checked for solder bridges, etc. and found absolutely nothing wrong with the circuit. After going back through my notes I started to put 2 and 2 together and got 741. I may not be good at math, but I can deduce that the 741s are the issue.

After ordering a new set of 741s from a reputable seller I was actually quite blown away and smitten by the circuit. It no longer squealed (as much), was a lot more dynamic, and the hissy mess was completely gone. Now, I'm admitting it's a 741 in a Rat circuit, so sure I may not be getting the whole Rat "thing", but simply going from a potentially fake 741 to what I assume is a genuine one really brought this pedal to life in a completely new way. Would I like a 308? Sure! Will I buy a 308? No. Even if I'm not getting the true Rat experience by using a 741 op amp, I'm still super impressed with the circuit as is. Maybe I'll build another and use a true Rat connoisseur approved op amp in that one. Maybe.

As I said earlier there are a handful of other pedals that have the shitty 741s in them, so I'll be doing surgery and swapping out the op amps soon. The most important lesson I've learned is quality parts are important, especially the op amps. As I move forward in my journey to build all the effect pedals I want I will implement all the lessons I'm learning along the way, and I'm sure there are still more lessons to be learned. I'm excited to get the 2023 season underway in a few months. I have five kits already setup for myself and some parts on order to complete them. Over the winter I'll find more ideas, I'm sure, but the 2023 season will be one of exploration in new territories with even more lessons to learn and mistakes to make. Let's just hope I don't do too much damage.

Addendum

The three main pedals that had the faulty 741 chips in them were my Morley MOD D1B clone, my Crowther Hotcake clone and my MXR Distortion Plus clone. After a bit of fiddling about with each pedal I removed the op amp and put in sockets, which were later filled with better quality 741 chips. After some audio testing and comparison I can say the Morley and Crowther clones are both amazing circuits and I'm super happy with the results. The distortion plus however seems to still suffer from a bit of fizz. I've listened to it side by side, to the best of my ability, with youtube sound clips and it sounds similar, but not as close as the other two sound to their genuine counterparts.

I've learned two lessons from this little experiment, the first of which I acknowledged in the original writing of this entry which is do NOT cheap out on op amps, buy from reputable sellers. And two is do NOT solder an IC, including op amps, directly into the circuit. I had a terrible time getting my desoldering tool to remove them, but once all was said and done, sockets were installed and these circuits are now working to their full potential, with the exception of the distortion plus. I'll continue to troubleshoot the MXR Distortion Plus clone, as now the op amp is socketed and can be easily swapped. After realizing just how good 741 circuits can sound, I've got a few ideas floating around in my head. We'll just have to see if they fit into the 2023 build season.

Monday, October 10, 2022

2023 Pedal Building and Plans Moving Forward

When it comes to effects pedal builds I started for two reason. Firstly because I am a massive fan of creating my own things, and secondly because most of the pedals I've cloned are pedals I couldn't possibly have owned otherwise. I never knew I would build as many pedals as I did, nor did I know I would build as many drive pedals as I have. Now I think it's time to move on to more, what I would call, enhancing effects. I did build a Disaster Transport Jr. delay clone that I like quite a bit and the Rub-a-dub Reverb, but it has a weird slapback that I'm not a huge fan of. Beyond delay and reverb I'm not sure what other type of modulation I would ever use. I've never been a fan of octave, phasers, flangers, tremolo or chorus, although the last two I could possibly see myself making and using, sparingly. So I guess that settles that; I'll build more reverbs, delays, maybe a chorus and tremolo, or two, and scale back on drive pedals, although I won't cease completely.

Another thing that I've wanted to build is a clone of old Kali, my Kalamazoo Model 1, or perhaps some other Champ 5F1 clone. The issue there is I'm not brave enough, yet, to deal with the higher voltages. Couple that with specific components I can't easily source, and I just feel overwhelmed and figure I'll have to build up to that sometime down the road. What I'm currently interested in is referred to as the Ruby Tuby. It seems to be a hybrid of solid state with a preamp tube, which sounds like a fairly good starting point to me. Naturally it wouldn't take Kali's place, but if it could run my 4x12 cabinet, strong emphasis on if, then it might take some of the stress off Kali when it comes to final testing of guitar pedal builds.

In conclusion the build year 2023 should hopefully be fun, and filled with new projects and sounds. My honest goal is to have a pedalboard made up of DIY pedals that I can actually write and record with. This year I reached a small milestone in having written and recorded a demo of my very first song. It's exceedingly rough and it has (hopefully) been shared with the person I want to hear it, and will not be shared any further. I do plan to work with that demo and make it better, but hopefully from there more songs will spring up that I can, and will share. I'll just need to see where things go.

Wednesday, September 7, 2022

There's Something About Centaur: The Final Build


There it is, my fourth Klon Centaur clone, but I consider it MkIII because it's the third that I built that didn't come from a kit. I used the Silver Edition layout from the tagboard effects website. On preliminary testing it seems smoother than the others and doesn't act up as much with an already overdriven amp as any of my other Centaur clones do. This one is another mini so that the Amazon kit that I built has a friend.

With this build being complete the 2022 building season is over. I do plan to build more pedal circuits next year, with packets of parts already being compiled. I would love to say that 2023 will be a more relaxed year, but the truth is I thought 2022 was going to be that as well, but I was wrong. To be honest I didn't do much this year. Sometimes I went weeks without building because I agonized about having to do the wiring, because I really do hate wiring pedals.

I'm going to keep this one short and sweet. We'll just have to wait and see what the 2023 build season produces. In the off season I'll restock parts, buy housings to put homeless circuits into and continue seeking a new challenge. Maybe 2023 will be the year I finally build an HM-2 clone.

Friday, August 19, 2022

Well, That Didn't Go as Planned!

At the end of last year's pedal building season I had already started forming ideas of what I wanted to accomplish in 2022. Ideas continued to form, and solidify, as November quickly slipped into being early March. The whole time I had assured myself that 2022 would be a more relaxed year, although if you looked at my 2021 season there was a massive gap that spanned three months with no building at all. In 2021 I had built a total of fourteen unique pedals, a far bigger number than my meager six (not counting the multiple test circuits that were never intended to become pedals) in 2020. I felt I didn't need many more pedals, therefore I wouldn't build many pedals, but I was wrong. As of writing this I have built an additional fourteen pedals, matching that of last year's season.

The problem, as I see it, is the Klon Centaur clones. This year I built my delay pedal, reverb pedal, a few blues derived pedals, a few fuzz variations, a few other overdrives and indeed four Klon Centaur clones of varying layouts. Once I built the kit I purchased from Amazon I knew I needed to build one from scratch, so I did. That turned into me wanting to build a few others to see how different each board would sound from one another, leading me to buy the Klon/Centura clone board from Amazon. Then another mini Centaur clone so the first Amazon kit has a friend its size. I truly never intended for it to get this out of hand, when my original projection was six total pedals this year.

Now, I do lean heavily into the notion that I don't need many more pedals, and that's true. I'm not a touring musician who needs every available tone at my feet at any given time, nor do I have the space to store such a collection. I do, however, like building pedals and the amazing feeling of having taken a batch of components and put them together in the correct arrangement to create something useful, and that may very well be my downfall. I find myself easily swayed into building a pedal simply because I like the way it sounds once it's completed, so I do foresee myself continuing to build pedals. I just know now not to put a number on it that I can't restrict myself to.

There are many pedals I plan to build, but I'm not exactly sure when I will do so. I've wanted a Boss HM-2 clone for a very long time, as well as some kind of take on the Timmy overdrive. I'm currently putting together packets for the 2023 build season, which will include a Box of Hall build, or two. Something strange has happened within my head as well, as I may plan to build a chorus circuit and link it to the ROG Mockman I built last year, to create a quasi-Rockman pedal. A lot of ideas flow, and I'm sure they will continue to formulate and solidify in the offseason when I'm trapped inside by the cold and snowy weather.

I may take building in 2023 to a more personal level as well. I was stoked with my Texas Rattler build, although my self-consciousness tells me I am the only person who would like that circuit and the only reason I do is because I built it, and slightly tweaked it. I feel as though I'm learning what goes where and why and if I modify this I can get this or that and adding this here, etc. so amongst my builds I plan to modify some circuits as well. I've done what I would call small modifications, such as the clipping switch on the Rata Blanca, but I want to try a few more things with some other circuits. I have some oddball diodes I want to see how they clip when put into a Boss OD-1 style circuit, which I do plan to build another.

In 2022 I also learned there are some pitfalls to amateur DIY pedal building, mainly sham components. I have over a dozen fake LM741 and TL072 op amps that I have no clue how to use, or if I even can use them, so that's why I now socket every op amp that goes into a build. I've been planning to build both a dual op amp and single op amp circuit with sockets to test op amps once I receive a batch to see if they're good or not. This will be more of a testing/diagnostic rig than anything, but it's tough out here when you need to buy things on the cheap, and you end up getting cheated. That doesn't change the fact that I have pedals I want to build, and I will continue to do so. I'll just have to be more careful about where I source my parts from.

Tuesday, July 26, 2022

There's Something About Centaur Three: Newest Addition

One more pedal earns it's Kali stamp of approval, and once again it's a Klon Centaur clone. Well, to be more accurate this one is a Centura clone. Since I built the first two Centaur clones I've continued looking for options just to see how, if at all, different they may sound. I understand differences could be contributed to components, but knowing that is part of the fun in building guitar pedals. While searching for different Centaur layouts I ran across a clone of the Ceriatone Centura board on Amazon, so I figured why not? As with all of the projects I'm excited to get finished I lagged quite a bit, so this project took a few weeks for me to put together, and even beyond that a few more to get wired up and finalized.

I purchased another 1590XX (aka 1790NS) enclosure and drilled it as closely as I possibly could to the original I had built. I do have the intention of painting this enclosure, but that's not really a priority. When all was said and done there was still precious little room to fit the board inside, but it did fit. Only just! On initial testing with the little practice amp the only difference I could determine between this and the one I built from scratch was that the clipping diodes seemed to kick in with the gain knob just barely turned up, as where the from scratch build starts somewhere between 10 and 11 o'clock. I did socket the 1n270 diodes on this build as I really do want to see if there is any difference once I can find an authentic pair of 1n34a diodes.

Once the new pedal reached the Kali testing phase something interesting happened. I didn't want to dirty the test so I plugged each pedal in on its own and did a basic A/B comparison by plugging and unplugging them as quickly as I could. I set both pedals with the treble at noon and the output just a tiny bit above 9 o'clock, which feels to be unity for both pedals. From there I would fiddle with the gain to see where the clipping kicked in and what the maximum distortion sounded like. The first observation was that the new pedals clipping does kick in a bit earlier, but through a genuine tube amp it's now around 10 to 10:30. Secondly I found out that this pedal has bass! Neither the kit, nor the one I built from scratch seemed to have any bass with the treble set at noon, but this one does have a kick to it. Otherwise everything seems to be just about the exact same, which is good.


I'm enjoying that all three pedals are essentially the same, but each have their own personality. I have an even greater respect for Bill Finnegan for painstakingly keeping the Klon Centaurs he built as close as he possibly could. Personally I enjoy building a pedal and knowing it has its own thing. Clearly I want my creation to sound close to what I was originally aiming for, but through using a mixture of pre-aged and new components they have a personality all their own. As you can see in the photo above my clone family is quite happy, and growing. I know I don't need hundreds of the things, but I'm having fun. Oh, what's the smaller one on the right, you ask? Well, that's for another day my friend, that one isn't done yet. Stay tuned...

Sunday, June 26, 2022

Feel Like Makin' Fuzz!

I can be quoted as having said I am not a fan of fuzz as a guitar effect. While this notion is still mostly true, I'm starting to come around and become more ok with it. After building my EHX Muff Fuzz and Shoe Pixel clones I'm starting to appreciate fuzz, the better I understand it. I still won't go overboard and start making a huge amount of fuzz pedals, most of which I would never use over just a plain overdrive. However, there are a few fuzz pedals that I now feel almost compelled to build, such as a Fuzz Face clone and at least one iteration of the Tonebender.

For a handful of years now I've had a pair of 2SB173 germanium transistors I took out of an old Calrad 10-75 mixer. At that point they were worthless, so I figured the components inside were worth more to me by recycling it rather than reselling it. I sat on these transistors for the longest time, debating what type of project would be worth using them in. Germanium treble boost? No, I already built a silicon one. Germanium Fuzz? No, I'm not a huge fan of fuzz. Well, maybe? After watching a video about the history of the Tonebender I started to think maybe a germanium fuzz would be a worthwhile build, but there were issues.

Old fuzz pedals use a positive ground, meaning I would have to add more to the circuit than I felt was necessary. Why couldn't there be a way to built a negative ground vintage inspired fuzz pedal? Well, there is! The project requires very few components and I could socket the transistors, so let's do it! And so I did. The resulting pedal sounds fuzzy and bright, with far too much bass. Is that the signature of a vintage germanium Fuzz Face? I couldn't tell you, but that's what I got. Am I happy with the results? Not entirely. I don't hate it, I'm just not connecting with it. I've tried silicon PNPs and they have a much more mellow bass while sounding almost identical in the fuzz characteristic.

2SB173 Transistors in circuit

I'm not exactly sure what I'm going to do with this circuit. Technically it's another pedal circuit that I've built and I'm proud of it, sure, but it didn't quite scratch the itch that I've had to use the germanium transistors, which was the whole point. Now that I know I can make a circuit using the negative ground I may just use silicon transistors in this one to finish it up and experiment with input and output caps in another to dial in these germanium transistors.

Update

Yet again Kali, my Kalamazoo Model 1, pulls through and proves why I depend so heavily on her opinion when it comes to my pedal builds. After testing the pedal through my Mustang Mini I wasn't 100% sure about it, there was just way too much bass. After testing this pedal through Kali the pedal sounds great. I know there is a lot to be said about sending a pedal through real tubes vs solid state modeling, believe me I know. Most times I simply test my pedals with the solid states, it's just sometimes I get lazy and hope the Mustang Mini is good enough; it's not. Now I'm feeling better about this build and I'm also more confident this germanium Fuzz Face clone was the project these transistors were meant to be in.

Tuesday, June 7, 2022

Small Amp Repairs

Today's title is literal in both meanings. Firstly I will be repairing small amps, and they are indeed small repairs to said amps. Up first is my Fender Mustang Mini with an input jack booboo. With the amp being as small as it is, and the input jack sticking out of the top, sometimes things such as guitars can accidentally bump into the cable while it's plugged in and snap that input jack. It happened to me!

I continued to use the Mustang Mini this way for a quite a while. I finally got tired of losing the part that broke off of it in the first place, because it was still required to hold the guitar cable properly, and decided to change out the jack. Now I almost made a mistake, but I think I managed to redeem myself. I checked to make sure it was all going to fit, and it seemed it would, until I completely mangled the original jack to get it out. Even though it was broken it still worked, but after I removed it I was at the point of no return and had to make the new jack work, even though it was slightly bigger than the original.

After it was soldered in, tightened down and everything was put back together it seems to work just fine. I am a bit concerned about it's longevity, but I guess we'll worry about that some other time. As long as it works I'll use it. The only external difference is that the new jack has a chrome ring around it, but otherwise it looks pretty good, I think.

Before

After

Next up is my Lyon AMP3. This is a little amp I've had for years and rarely ever use, because it's really just a novelty more than anything. One day, many years ago, I noticed it wasn't working properly, so I opened it up to see what was the matter. The only problem I could find was one of the capacitors was absolutely obliterated. It was just a pile of dust between two solder mounds. I was confused because even back then I rarely used it and it worked perfectly when I put it away. I decided to replace the capacitor with whatever I could steal from my collection of old broken electronics.


As you can see I didn't do the cleaned job installing the capacitor, but it worked and that's all that mattered. I figured since I was going to be soldering on the Mustang Mini I may as well give this little amp an adjustment. My SMD soldering skills aren't any better than they were when I originally repaired it, but it's somewhat more refined. Kind of? Regardless it works and I feel a little better about how it looks inside.


Small repairs that will hopefully extend the life of these little amps. The guitar pedal builds have ceased, for now, as I'm not sure how many more guitar pedals I need. I have some ideas, but they're currently just ideas. I felt I should use this nice sunny day and get something accomplished, so I did. Yeah, I do need to work on my SMD soldering skills.

Wednesday, June 1, 2022

The Process

I've been wanting to share the process of how the guitar pedals I build go from idea to finished product. All the pedals I've built, with the exception of the one I built for my brother, are built for my own use and are not production models, nor are they production quality. This is simply a hobby that I enjoy, and hopefully will continue to enjoy for some time to come. I felt that if anyone out there came across this blog and were interested in starting the hobby, or wanted to acquire a little more knowledge to streamline their own process, perhaps I could shed a little bit of insight and help them out.

Initial Planning

The very first pedal I ever built was a Bazz Fuss, followed by a few variants after that. Since then every pedal I've built started off as a question. What type of effect(s) do I want, or feel that I need, or even want to try out but can't afford the genuine version? I had always wanted a tube screamer style pedal, and although the genuine thing and its many clones are ubiquitous, I decided I would take more pride in having built my own. I searched around online for a tube screamer layout and the first website to popup was tagboardeffects. I searched their extensive library of layouts and chose the tube screamer that I felt the most comfortable building and got started.

Cutting the Board

This part is fairly straight forward, depending on how big the layout requires the board to be. I usually use stripboard, which is a thin fiberglass board with strips of copper adhered to it. I've tried some other stuff and only ever had slight success with it, but much frustration, so I've stuck to stripboard as my main circuit board material. From here I will count out how many holes the layout requires, both horizontal and vertical. I do this with a toothpick, believe it or not, and I count out each way two or three times before I mark it with a sharpie, just beyond the required length. Once I am satisfied that the dimensions are correct I use wire cutters and snip along the row of holes just beyond where I marked. Sure, you lose a row of material, but it's better than making a mistake and needing to cut a whole new board. From there I'll snip off any rough edges, sometimes even using sandpaper for further adjustments where needed. Measure a hundred times, cut once!

Many layouts will require you to cut the traces on the board to reroute the signal of components on that row to somewhere else. I use the same toothpick method as I do for getting the board down to the right size here too, and I will then mark that hole with a sharpie and then count it off a few more times to make sure I've marked the right place. I usually reference the layout image and count both horizontal and vertical holes in all directions to make sure this one spot is where the trace cut needs to be. Once all the trace cuts have been marked and verified I use a step drill bit in a screw driver handle that uses interchangeable bits. With firm, but not too firm, pressure I place the tip into the hole and twist until I see fiberglass dust. I then blow the dust away and see if the trace looks properly severed. Once all traces have been cut, I use a multimeter to make sure there is no current being passed beyond the trace cuts. I then use an xacto knife and clean up around the hole, to make it less likely to be bridged while soldering.

Collecting Parts 

All guitar pedal circuits are made up of components, usually consisting of: resistors, capacitors, diodes, transistors, JFETs, op amps, and other ICs. I like to bag up my parts in little bags and write on a small piece of tape what the build is going to be. I start off with the lower laying parts, such as resistors and diodes. These components are the ones I solder onto the board first, so I like to find them first. Then I find the capacitors, then any transistors or JFETs and from there I wait until the main board is built to even think about op amps or ICs. I usually find these parts from old electronics, but I do have a collection of new parts just in case the old electronics I have can't yield the parts that I need. I will reference a part with online sources to make sure I am collecting the correct value. Resistors will have colored stripes that will calculate the value. Capacitors often have their code as well, for example 104 on a capacitor means that capacitor is 100nf (nf meaning nanofarad). Other components will also have their markings, so if you have any questions check online to cross-reference the component's code/markings to make sure it is what the circuit requires. A little wiggle room, or tolerance, is allowed on parts so don't be afraid to substitute something fairly close with what is required by the layout.

Populating the Board

Now that the board is cut, the parts are bagged and the soldering iron is hot, it's time to start soldering everything together. I start off with the links, which are simply thin pieces of metal, often the leftover legs I've cut from the underside of installed components. These are used to replace the traces we cut previously, and are the lowest laying aspect on the board. Then I start placing the components in a grid pattern, much the same way I used to cut the board. I start off with resistors and diodes, paying very close attention to the polarity of the diodes in the layout and how I place them on the board. Once I've made sure I've placed all the resistors and diodes in the correct places I begin placing the capacitors and other tall components. I use the previously installed components as landmarks to help align these other parts, while also minding the polarity of the electrolytic capacitors. The last parts I do are op amps or other required ICs, which I will often install sockets for, just in case I happen to have a damaged one and need to replace it quickly. Sometimes I will socket transistors and JFETs also, which allows me to test out different ones to see how they affect the sound. One thing to keep in mind when using sockets to test transistors or JFETs is that they will need soldered in upon finalization of the pedal. Believe me, I've had a few pedals stop working because a transistor wiggled loose from its socket. I also can not stress how useful a component tester is when soldering up the build. I test both resistors and capacitors to make sure the correct values are going into the correct places.

Prepping the Enclosure

Not every pedal I build will immediately have an enclosure to call home, but most of them will. Whether it's a Hammond 125, 1590 or even an old cookie tin your grandmother used to keep her sewing kit in, prepping the enclosure is usually one of the easiest parts of building a guitar pedal. The first step is to do a mockup to make sure everything will fit inside comfortably, and without grounding out the circuit, causing it to make no sound at all. Once you're sure everything will fit inside it's time to design your pedal. Do you want to paint it? Do you just want to keep it aluminum? Your choice, go with whatever you feel is best for you. Next you'll want to figure out the layout of your controls, footswitch, electric input and your audio jacks. There are plenty of templates online, or you can do what I do and freehand it. None of my pedals are 100% symmetrical, which gives them more of that DIY feel. I use masking tape to roughly mark out my control layouts, and use the step drill bit I used to cut board traces from there. It's not rocket appliance, but make sure you don't drill the electric input in the same end you've already drilled for your footswitch. That's a mistake I'll never live down!

The Dreaded Wiring

I feel since wiring is what stands between me and a finished pedal I enjoy wiring much less than I do any other aspect of the building process. There isn't much advice I can offer here other than to watch a few tutorials online and make sure you've grounded everything properly. I like to pre-tin the wires before I stick them into the board to be soldered, but be careful as sometimes that may cause them to be too thick to fit through the holes in the board material you're using. Pay close attention and don't mix up your input and outputs. Keep a pinout chart handy for potentiometers, power input sockets, the footswitch of your choice, etc. as they can be very useful. I would also advise investing in a good set of wire strippers, they're worth their weight in gold! Once you've wired up a few pedals it's usually straight forward, although every circuit does have its own quirks and wiring placement. Often if I need to troubleshoot a circuit I almost always find it to be a simple wiring mistake, which is a much easier to rectify situation than having to remove/replace a component packed deeply on a populated circuit board.

Initial Testing

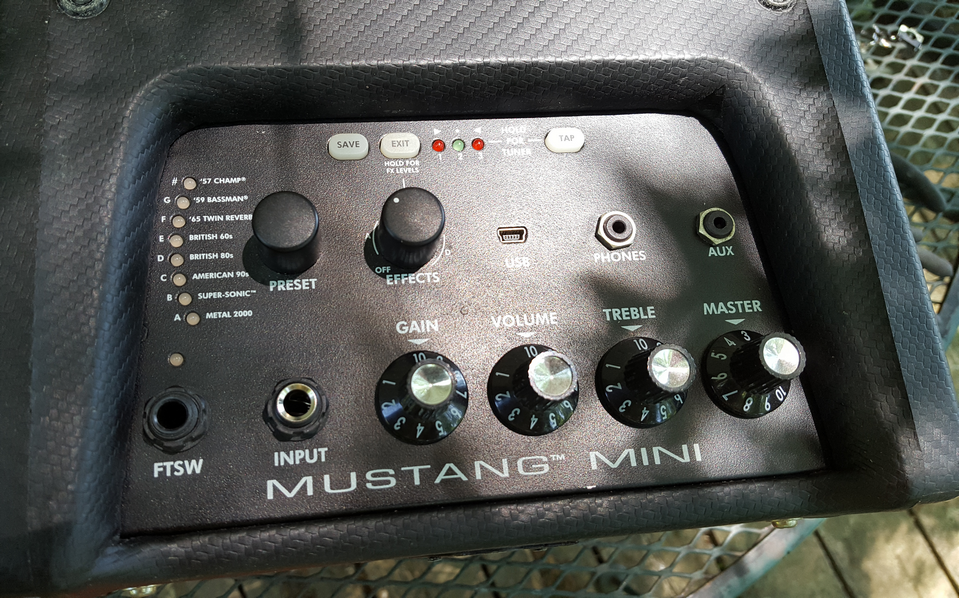
Initial testing consists of me using my partcaster (Neo Classical Strat), my Fender Mustang Mini, a Danelectro Zero Hum power supply and hoping nothing within the circuit goes boom. I then plug it all up to make sure that signal is passing in bypass mode with a few chords from Neo ringing through the Mustang Mini. Once I feel I'm ready I click the footswitch and prepare for excitement, or crushing, frustrating defeat. Again, one of the most common mistakes I've made is wiring related. I've wired potentiometers in backwards, I've mixed up the input and output, I've forgotten to ground the input and output, etc. I won't say always, but a large percentage of my guitar pedals work first try and are good to move on to final testing. Some circuits however are either using test parts or aren't giving me exactly what I expected from them, which causes them to be put into troubleshooting mode.

Troubleshooting or Parts Testing

Usually a simple wiring swap cures what ills a pedal, but sometimes it doesn't. If a circuit sounds different than I was expecting I will go through the comments under the layout on tagboardeffects and see if anyone else is having the same problem, where I will often find the solution. The comments section on that site is actually just as useful as the layouts themselves. Honestly, it's a great site. If I'm testing parts I will swap them around until I find what sounds best and (remember!) solder them into the socket to make sure they don't wiggle loose down the road and stop the pedal from working mysteriously. I only solder transistors or JFETs into their sockets as thus far I've not had any issues with op amps or other ICs wiggling loose, but that doesn't mean it can't happen.

Final Testing

Once a pedal is tested thoroughly and put through its paces with the Mustang Mini I switch over to the true lie detector, Kali, my 1960s Kalamazoo Model 1 tube amp. I've found a few circuits work perfectly fine through the Mustang Mini, but sound rather dull and lifeless through Kali. In the case of my treble boost build I found it worked great on the Mustang Mini, but Kali absolutely hated it, which caused me to rethink and adjust some of my modification choices. Kali is the final word when it comes to my guitar pedal builds as she is truthful, unabashedly so. I give her a few minutes for her tubes to warm up, I plug the pedal and guitar in and see how she sings. If a pedal and Kali can make a connection I can usually find a groove that allows me to test the range of the pedal's controls and once I'm satisfied with that I consider the pedal to be officially done.

Finalization

In every pedal I've built I've handwritten on the inside of the bottom case (lid?) the date the pedal was finalized, what I've named it, or what it's a clone of, and marked it with my faux brand Firebeard FX. I plan to get little boxes for each one and include a small printout explaining what the controls do and what it's based on. I've never painted any of my pedals, though I've wanted to. I'm perfectly fine with them as they currently are, which is functional and complete. That, to me, is when a guitar pedal build is finalized.

My thought is that someday I will cease to exist on this planet and only my former belongings and social media will remain. Someday someone might happen upon one of my creations and perhaps fall in love with it, making it a key part of their tone. Hopefully due to curiosity more so than needing to repair it, they will open the pedal and find my handwritten description of the pedal and the date it was built. They might take it a step further and research who Firebeard FX was and be directed to my social media, perhaps sending them on a grand adventure in understanding more about the pedal's creator and the process and care that went into creating it. As I'm writing this I have built thirty pedals in total and I honestly don't want to stop, I just need more reasons to build more pedals beyond sustaining a hobby I thoroughly enjoy (all except that damn wiring!). I would like to build a guitar amp, but that's almost entirely wiring. Ugh!

If you're thinking about getting into the hobby, or already are, and this has helped you, thank you for reading. It really is a fun, fulfilling hobby and I'm glad I took that first step in building my first Bazz Fuss. Trust me, it does get easier the more you build. Also, try to learn as much as you possibly can about what part does what and why when you build a circuit. Who knows, maybe someday we'll start a real pedal company once we understand enough about pedal circuits and how to build our own. It would be nice, no?

Tuesday, May 24, 2022

There's Something About Centaur Two: Redux

This post may look familiar, that's because it's an edited version of the previous iteration. Please feel free to read it again with the edits or skip it all together. I'm not your parents, you can make your own choice, but I do appreciate you reading at least this part. Thank you!


Since I built the Centaur clone kit I felt the next logical step would have to be building my own from scratch. Deciding which layout would sound the closest/best was my main concern. I guess they would all have to at least kind of sound like a Centaur, right? So I chose a layout from my favorite website and got to collecting the parts. After that was done I cut the stripboard, made all the necessary trace cuts and got down to making the pedal. To say I was nervous would be a grand understatement. So many components, so many chances to make a mistake.

To be completely honest I've had the parts for this build since early this year, but I've been putting it off due to my lack of self-confidence. The day had finally come, but I still decided to make it a three day event. The first day I soldered on all the lower level components and made sure I had them all in the right place. After going over the board a handful of times my eyes started to get hazy, so even now I'm just assuming all those components are in the right place. Day two was soldering on all the capacitors, which was made easier by the previous day's work as I could use those components as landmarks to make sure the capacitors went in correctly. Or, as correctly as they possibly could be. The third day started off with me building a completely new pedal because I was so put off by the complexity of the wiring the Centaur clone required that I decided to give myself an extra day.

Day four started out wiring up the other pedal I had built as a distraction from having to wire up the Centaur clone. I told myself that if this pedal worked fine after I wired it all up and tested it that I would finish the Centaur clone as well, but only if the first pedal worked right. Upon testing the distraction pedal I noticed the drive control didn't work properly, but it mysteriously fixed itself. Not kidding, it just fixed itself. I guess someone on the other side really wants to see me finally finish this Centaur clone, so I did. I was so beaten by the wiring process I almost wanted to extend this event into a day five, but I decided against that. I'm kind of glad I did, because the pedal worked right away, which was a surprise, as well as a massive confidence boost.

It sounded good and the controls functioned as they should, but when I compared it to the Centaur clone kit I built earlier this year I noticed there's just something odd going on when the clipping diodes are mixed in. For some reason it gets dark, even more dark than the treble control seems to be able to compensate for. With the gain turned off completely I would say this pedal sounds the same as the Centaur kit, but with the drive turned up it starts to darken up in a way that I don't like, compared to the kit. On it's own the newest build isn't bad, it's just different. It has the Centaur thing going on and sounds pretty good, but my only complaint is comparing it to the kit I built. Maybe I shouldn't be relying on a clone kit to be the benchmark I'm shooting for when it comes to what I hear out of this pedal.

After doing extensive research I found there is some debate on which value resistor goes where on the treble control of the Klon Centaur and its clones. I looked at everything from my kit build, the Centura layout, Aion FX boards, BYOC boards and everything in between. It seems the general consensus is that the layout I used has them swapped backwards, thus making the pedal sound darker when more gain is added. I decided to swap the resistors around and could tell right away that this was far more on track with what I was expecting than what I was previously getting. It still may not be 100%, but I'm gaining ground toward what I expect to hear from a Centaur clone. In the future I might do a more gain mod, but I'm not convinced this one needs it. I guess we'll see what happens.

So for clarity: anyone having an issue with a Klon Centaur clone being dark and muddy, the 1.8k resistor goes on Treble 3, and the 4.7k resistor goes on Treble 1. That's what fixed it for me.

Saturday, May 7, 2022

The Texas Rattler Treble Booster.

One effect I never fully understood was the treble booster. I knew Brian May and Stevie Ray Vaughan used them but I didn't know a myriad of other guitarists such as Tony Iommi and Warren Haynes use them as well. After watching Warren Haynes' rig rundown (again) I took notice of the Cesar Diaz built Texas Ranger he had hidden away in his effects rack. After a few days of pondering I figured I may as well throw one more project on the to do list. Luckily for me treble boosters are fairly simple to build, and it seemed as though I already had everything I needed to build one. I originally wanted to build a Diaz Texas Ranger clone, but I didn't have a rotary switch for the selectable input cap feature so I decided to start looking for something else.

The most popular option seemed to be Catalinbread's Naga Viper, so I found the layout on tagboard effects (where I get almost all of the layouts for my builds) and started my journey. The Naga Viper has an additional gain and tone control (called heat and range respectively) along with the boost control, which sounded like features I would never actually use, but I built the pedal with these features just to rule them in or out. I didn't want to build a straight clone of the Naga Viper so I took a few liberties such as socketing the transistor to see which of the ones I had sounded the best, finally settling on a BC548. I also put in a toggle switch to switch between a 5nf and a 100nf input capacitor, mimicking the highest and lowest options of the Diaz Texas Ranger, which I later removed because I felt it really just muddied everything up, leaving the 5nf in as the main input cap.

After a week or so of testing I decided to remove the tone control, but without it or the input capacitor switch I felt the build was now missing a way to thicken it up. Even though I didn't like the tone control there was none of the mud that the input cap switch seemed to introduce, but it did give it a thicker, somewhat fuzzy edge that I kind of liked. In place of the potentiometer I used a toggle switch to close or open the place where the potentiometer once was, which gave me both extremes of the tone control's range. This suited me perfectly. Once all was said and done I decided to keep the gain control as it turned out to be quite useful in taming some of the girth when the tone switch is in the thickest position.

I normally question how closely all my other builds sound to the originals they were inspired by, but since this build was inspired by both the Diaz Texas Ranger and the Naga Viper, plus I did some slight mods, I'm not sure how it would compare. Since it only has a few components it could either sound very similar or not at all, but either way I'm fairly happy with how it turned out. I've named this build the Texas Rattler, borrowing from the Texas Ranger and the viper part of Naga Viper. The controls are Hiss (boost), Heat (gain) and Humidity (Low/High tone switch). This build has not only inspired confidence to explore ways to adjust a build to my needs, but also I like to think I've learned more about what a treble booster does and why some of the greats have used them throughout their careers. I swear I didn't want to build this many guitar pedals in 2022, but I'm glad I chose to build this one.

Wednesday, April 27, 2022

Pedal Redemption and Progressing Forward

As I said before sometimes you can't win them all, but that doesn't mean you should cease persevering. The initial results of my Runoff Groove Umble clone (I've dubbed the Humble) were nowhere near what I had hoped for. Since biasing JFETs was new to me I wasn't shocked, I was just disappointed. Things looked bleak at first, I was lost and confused about how I was ever going to make it work. I knew I had come this far and I wasn't about to let it go under any circumstance. Sure, I'm an idiot and I made mistakes but I decided to sit down and try to fix it the best I could. I think I've learned a lot along the way and the end results are far better than where I was before. I've learned to never give up on something you're passionate about, and keep trying to do the right thing and make it better. Eventually you'll get there.

Truly Humbled by this build, but the results are worth it.

This redemption spurred on my desire to fix up a few of my older builds that had some minor issues. Both my LPB-1 and Boss OD-1 clones had wandering transistors that needed to be addressed. Initially I used sockets to test which transistor(s) sounded best in those pedal builds, but once the pedals were enclosed in their aluminum homes I noticed they didn't always want to work. While investigating the situation I found the transistors had wandered loose and needed pushed back into their socket to make the pedal work again. Instead of removing the sockets I decided just tacking one leg of the transistor onto the socket would keep it from wandering out of place. Voila! Job done.

Technically all the pedals I've built are functional, but some do have issues that require more involved troubleshooting than even the Humble pedal did. My initial feelings when I test a new build are a mixture of hope and the understanding that there might be an issue, so I need to try and troubleshoot with a clear mind if it doesn't work the first try. Sometimes I've had to rebuild the board all over again, sometimes I've wanted to throw the whole project into a woodchipper, promptly followed by myself, but that doesn't solve the problem. I just take a breath or two, sit back down and make sure it's wired correctly, then go over some basics that I know I can solve right away.

As for progress forward, well that's a bit of a dicey situation. I originally planned 2022 as a relaxed year where I would only build half a dozen pedals that I really need to build and spend the summer actually using them to create some music. That, however, is not exactly how things are shaping up. My original to build list consisted of the LandTone Centaur clone, my Blues Master (Bluesbreaker clone), my Rata Blanca (Rat clone), an EQD Disaster Transport Jr. delay clone, a Rub-a-dub Reverb Deluxe clone and another pedal I'm not going to discuss yet, as it will get its own post once it's done. Since four of the six pedals I planned to build came together so quickly I figure I could add more pedals to my list. So far I've added two pedals to the list, one of which I'm planning to mix two pedals together to make one.

One of the newly added pedals has already been built. I wasn't sure at first whether I wanted to build it, but because it really didn't need that many parts I figured I may as well. Thus, the Shoe Pedals Pixel clone was born. I'm not a big fan of fuzz, but I am a big fan of vintage video games and this pedal brings them both together. It took me a little while to get that 8-bit sound dialed in, but when I did I was very impressed. Not only that but it actually has a very useful fuzz hidden in there, which is kind of changing the way I feel about fuzz as an affect.

Part of the Class of 2022: Blues Master, Rata Blanca and Disaster Delay.

I still have a few projects to start and I'll get to them when the time is right. I have some ideas where I'm going to try modifying and mixing together a few pedals to build a kind of unique design of my own making, and a few other pedals I want to take the time and get them done right. Trust me, regardless of how those plans work out I'll be posting the results here as either tales of success or yet another cautionary tale of my failure. I guess we'll just have to wait and see how it all goes. Wish me luck!

Tuesday, April 12, 2022

Creature Comforts

There are many things in this world beyond our control, but somehow most people tend to be able to cope.
Everyone has their own thing(s) that put them at ease, whether it be a thought, or maybe a physical item.

At a younger age I used video games to calm myself, when the world at large just felt too overwhelming.
My world, at least back then, wasn't too stressful. After all I was a kid and really didn't have much reason.
Over the past few years, as I grow older, things have started to become more and more uncomfortable to me.

Perhaps it's just what happens as one starts to age and the veil of adolescence finally starts to wear off.
All I know is that I'm feeling increasingly stressed the older I get. Time really does fly when you're a certain age.
Optimism has never been my strong suit, but I feel the older I get the more I need to try and harness or use it.
Lately I've been thinking more about my future, but even more so about the past, when I was much happier.
At my age I guess that's just the natural trajectory of the mental gearing. Thinking back to brighter days.

In my mid-20s I used movies, specifically Me, Myself & Irene as well as Clerks 2 to calm myself through stressful days. There is one scene in Me, Myself & Irene where Jim Carrey and Renee Zellweger are walking down a country road, which reminds me very much of the country road I grew up on. I guess something about that road unlocks something in my mind and transports me back to being a kid. Back then all I had to do was wake up, hop on my bike and be back home before dark, but even so my childhood years aren't the best years of my life.

When it comes to Clerks 2, I feel it has a bit more to do with the fear of growing up. The fear of what changes growing up not only offers but sometimes even mandates. No matter how young we are in our own minds, we're slowly but surely leaving behind the comforts of our younger selves. In many ways that's good, but there always seems to be that nagging feeling that you're going down the wrong path and you long to stop being a grownup and return to the simpler times. Clerks 2 came about in my life at the perfect time, where I felt I could connect with the characters and feel their strife. This is about when my life started to actually mean something.

These days I'm finding it harder and harder to find anything that helps me settle down. I had it, I had someone who could calm me down quicker than anything else ever could, but she was lost along life's separation path a few years ago. I've tried the old movies, I've tried new movies, I've tried music, I've tried building guitar pedals, I've tried video games, but something is still missing. A large part of me, who I feel I should be, who I should be with and where I feel I should be are now just missing pieces, leaving even more doubt and anxiety. These were the definitive years of my life, these were the best years of my life. I love that time in my life, it's a massive part of me. I deeply miss that part of me. I just hope, wherever she is now, she knows that and will always remember that.

"You're here with me, it's going to be ok." - My Missing Piece

Friday, April 8, 2022

There's Something About Centaur

After I refurbished Kali, my Kalamazoo Model 1, I started feeling the need to expand my effects pedal collection, which at that point was merely two pedals and a Zoom 506. Eventually the DIYer in me decided it would be more fun to just build clones of the pedals I've always wanted on my own. Once one pedal was done I would often research for hours on end, trying to find out which pedal I wanted to build next. It has to be said that no other pedal has taken up more of my research time than the legendary Klon Centaur.

Admittedly I was completely unaware of this pedal's existence until after I started building pedals. The more I researched the Centaur the more intrigued I became with it. One man's quest to replicate the way guitar amps sound when they have reached harmonic perfection, while doing so at any volume, at any venue. After years of testing and help from engineers the Centaur was born, all according to legend. Although I'm nowhere near that level of pedal builder, still I connected deeply with the one-person operation aspect.

I will most likely never even see a real Klon Centaur pedal, let alone own one, so my DIY pedal builder instincts kicked in. I started researching what would be the most accurate Centaur clone that I could build for myself. One option that kept coming up was the LandTone clone, often purchased from Wish.com preassembled and ready to go. I watched as many comparisons as I could find of this pedal beside either a real Centaur or highly accurate clones. Even through youtube I could tell the inexpensive little pedal wasn't a 100% accurate recreation, but it did sound fairly close to what the comparison pedal was doing. So close that I decided to purchase the pedal kit from Amazon and build one for myself.


I've gone over my building of the clone kit before, so I won't bother with that here, but I have to say I've become enamored with what the little pedal does. From clean boost, treble boost to an overdrive that is super dynamic depending on your pick attack. This pedal really seems to offer a lot in one pedal, and that's just the clone pedal I've built. I can only imagine what a real Centaur would offer, which I feel would have to be better to some degree.

For the longest time I felt the tube screamer was the cream of the crop, and while I still love the TS808 clone I built, I think this Centaur clone kit just opened a completely new door. There is just something about the Centaur that I really connect with tonally. The blend feature, I think, is really where the magic is, allowing this pedal to go from clean boost to all out overdrive, with the aforementioned other features allowed to dwell within that spectrum. Of course I'll still use my TS808, Boss OD-1, DOD 250 and whatever other drive clones I've built when they're needed, but I have to keep saying there is just something about the Centaur that sets it apart in a great way.

Sunday, March 20, 2022

Well, You Can't Win Them All!

Sometimes life slaps us in the face just to see if we're still paying attention. One such instance for myself was the other day when I was trying to put the finishing touches on what I felt was my most ambitious guitar pedal build yet. This pedal was meant to be my foray into JFETs, but it didn't go as planned. I was already anxious about the project because I finished the circuit board back in October of 2021, but I didn't have the JFETs or the enclosure to put it into until more recently.

The project in question is a RunOff Groove Umble. I was instantly intrigued by how good this pedal sounded in the demos I found online. The build seemed simple enough, but I was nervous about the need to manually bias the JFETs. To compound my anxiety about this build I used perfboard instead of stripboard, as I was running low on stripboard. I had made a few pedals using the perfboard and they turned out alright, so I figured I may as well, right? HA!

It will look pretty cool once it's done though, right?

I originally planned on this to be the first pedal I finished for the 2022 season, but instead I built two other pedals. Even though all this project needed was wired up and the JFETs biased, I was still putting it off until I felt I couldn't put it off anymore. Wiring didn't take as long as I had feared, which was nice, because I really do hate wiring guitar pedals. With everything setup it was time to put the board into the housing, bias the drains and bask in the glory of finally having built what I consider to be my most complex build so far. That's when things took their turn.

I cautiously plugged the pedal in, as I always expect something to blow up the first time I plug in one of my builds. Can you guess what happened next? Well, nothing exploded, so that was a plus. I was relieved to find that 9 volts was flowing into the pedal as it should and nothing was smoking, smoldering or exploded. Time to bias the drains. Right? Nope, what I had worried about the most became the issue I wished it wouldn't have.

I think my first problem was the layout I used calls for 100k, but I used 10k because that's all I had at the time, but that simply didn't work whatsoever. In an attempted Hail Mary I removed the 10ks and installed proper 100ks. Can you guess what happened next? Nine volts goes into the pedal, the 100k biasing pots turned all the way down only brought it down to 8.5 volts. Yep, something's fucky!

Handwriting FaIL too.

It was at this point I decided to activate Plan B, which was to cut a completely new board out of stripboard and attempt to build this pedal all over again. I've had to tear down pedals and rebuild them from scratch a few times, but I really didn't want to have to build this pedal more than once. For over an hour I sat there harvesting all the parts off the perfboard failure and testing them to make sure they were still within spec and could be reused for the rebuild. Everything checked out good enough, so I just bagged them up and decided to wait a few days before giving this project another try.

After a few days of rain the sun finally came back out, so I decided it was now or never. I rebuilt the whole pedal and set everything up to bias the JFETs. Well, it turns out I am an idiot and didn't know the JFETs need to be in place to be biased. See, I assumed I could bias the sockets I installed to accept the JFETs prior to putting them into place. NOPE! That's not how that works. Lesson learned, we're moving on. The reason I used sockets is because I had to build my own J201s from the surface mount size and convert them to through-hole. Also this gives me the option to change what's in there right now for TO-92 version J201s in the future.

While testing the pedal it sounds very thin and weak until the volume was cranked all the way up, but then it started screaming because it was cranked all the way up. I've had the screaming issue with a few other pedals and I'll figure out a fix for this someday, just not today. The EQ section seems to work, it's just the bias is still off, even at the suggested 4.5v. I guess those are rookie numbers and I'm going to have to pump those numbers up. For now the pedal is what I would consider finished, even though it still needs some tweaks, which will hopefully bring it around to working properly. I have dubbed this pedal the Humble as this pedal has well and truly humbled me.


Update: 12, April 2022

After sitting on this pedal for a while I finally decided to tinker with the biasing and was able, rather quickly, to figure out which JFET was the offending party. To be honest all of the JFETs needed a little voltage adjustment, but I blame myself in building the adapters to make them through hole from SMD. I still want to track down genuine TO-92 formfacter J201s, but for now it's functioning. I'm not exactly sure this is how it should sound, but I managed to dial in a much better effect than it was the day I put it in the enclosure. Now that I'm confident with biasing JFETs I will continue to tweak this pedal and I may even attempt more JFET based projects.

Tuesday, March 15, 2022

Pedal Building: The Centaur Clone

My guitar pedal building season 2022 started Monday March the 14th. It was a blustery day and the shade of the back deck made it almost unbearable, but I knew I had to get started sometime. My first pedal build was the Klon Centaur clone kit that I had just gotten a few days prior. I put this one ahead of my other builds as I felt time was important. Should there be any parts missing or issues arise with this pedal I would need to contact the seller as soon as possible. At present everything seems to be fine, for the most part.

My workspace on the back deck.

I started off as I always do; lowest components first and work upwards from there. I tested one of each component to make sure they were all labelled correctly. Can't be too careful! Everything was well marked on the main board, with the exception of one of the 100k resistors and the 821pf capacitor being a bit off, but I knew where they went after everything else was soldered up and they were the only parts left and their slightly misaligned places were left empty.

Stage 1

Stage 2

Stage 3

Once the main board was populated it was time to put everything into the housing and do some wiring. Wiring has to be my least favorite part of pedal building, but it has to be done. My distain for wiring was compounded by the fact the provided instructions are extremely vague on what wire goes where. I've wired up enough pedals to know how to wire up the input, output and DC jacks, but where on the board they go is the main mystery here. After doing some research I felt I had a good enough grasp on what went where and I went to work soldering it all up.

Stage 4

The problem is, I was wrong. Even after watching a few videos of people building it from start to finish and reading through some tutorials I still managed to get the output jack wired wrong. Once that was all squared away I had built a really nice pedal. Now, the elephant in the room is that this is a clone of an extremely well known and exceedingly sought after pedal that costs more than a decent used vehicle. That's exactly why I decided this was a project I was more than willing to tackle. I'll never own a real Centaur and even if this pedal doesn't replicate the tone exactly, what this pedal does still sounds pretty good to me. That means it's time for me to start my next project. Stay tuned!


Thursday, February 24, 2022

Pedal Building and 2022's Plans

What started out as a long time desire has grown into twenty confirmed builds. On January 2nd 2020 I put together my very first Bazz Fuss circuit. If you want to get technical about it I did build a footswitch for my Fender Mustang Mini a few years prior, but I don't consider that to be a true pedal build. My main focus was using/reusing parts I already owned or could harvest from electronics nobody wanted. From there I built a handful of other Bazz Fuss circuits, none of which count toward the twenty builds mentioned above. These builds were simply built to play around with values and component types to see how much of a difference it would make in the sound of the circuit.

Fast forward a few months when I noticed my Bazz Fuss pedal was now just boosting the signal, instead of being a fuzz pedal. Somehow I had destroyed the diode and the circuit became a super simple boost pedal. This is where things started to ramp up. Had I stopped at a handful of Bazz Fuss circuits I may have literally just stopped, but I began to research an easy to build boost pedal. Thus, the LPB-1 clones were made. A few weeks later I was given the chance to take apart an old radio my Dad had in the garage and found an NEC 4558 op-amp, and from that my TS808 clone was born. The wheels kept on turning and my Grey DOD 250 clone was born. Soon I felt that since I had built a DOD 250, I had to also build an MXR Distortion Plus, so at the beginning of the 2021 build season that's exactly what I did, but that was only the beginning.

2021 was the most active building year. From my Marshall Guv'nor clone, to many various DOD 250/MXR Distortion Plus clones, such as the Morley MOD-D1B, all the way to a R.O.G. Mockman build I was very busy last year. As 2021 came to a close I had built thirteen pedals with one more left at about 75% complete. It's my most complex pedal build and I hope to complete it as the first pedal completed for 2022.

And here we are in 2022 with a whole new season to build, but also a new year to enjoy the pedals I've built over the past two years. Some pedals have blown me away with how amazing they sound, while a few others continue to baffle me with varying issues. Although the perfectly working pedals heavily outweigh the pedals that exhibit some issues, I still have to troubleshoot the pedals that aren't exactly right. It's a process that I'm greatly enjoying and I'm hoping it leads to something bigger. This year has seven pedals in the planning stage, but it may also turn out to be a transition period for me as I plan to build my first pedal from a kit. I just want to see if I like building kits as much as I do building from scratch. 

Who knows, maybe if I purchase pedal kits and upgrade some of the components in them I might be able to turn this into a viable business of sorts. While I don't foresee that actually coming true, the plan is on the table. We'll just have to see where 2022 leads and what ups and downs I'll have to contend with. Maybe things will work out too well and I'll build more pedals this year than I did in the previous two years combined. For now I'm not sure what will happen beyond 2022, but I do know that I don't plan to build as many pedals, at least for now. However I will always be up for building a pedal here and there just to keep boredom away, or if something really interesting I want to build crosses my path.